
An EV owner has two main options to charge an EV at home. They can use a standard wall outlet or a dedicated EV home charger. A dedicated Chargeur de VE provides faster, safer charging. It is the recommended method for most electric vehicle owners. Charging at home with a dedicated unit from leading Fabricants de chargeurs de VE offers superior Solutions de recharge pour véhicules électriques compared to basic chargeurs portables pour VE. This ensures the EV is always ready for the road.
Understanding Your Home Electric Vehicle Charging Options

An EV owner must first understand the two primary levels of charging available for residential use. These are known as Level 1 and Level 2. Each level offers a distinct balance of speed, cost, and installation requirements. Making the right choice is fundamental to a positive ownership experience.
Level 1 Charging: Using a Standard Outlet
What is Level 1 Charging?
Level 1 charging is the most basic method of electric car charging. It utilizes a standard 120-volt household wall outlet, the same kind used to power a television or lamp. This method requires a mobile charging cord, which typically comes included with the purchase of a new EV. The owner simply plugs one end into the wall and the other into the vehicle’s charge port. No special installation is necessary.
Charging Speed and Ideal Use Cases
The main characteristic of Level 1 charging is its slow speed. It typically adds only 3 to 5 miles of range per hour of charging. For example, fully charging a 60kWh EV battery from empty can take a significant amount of time, often between 18 and 22 hours.
Remarque : Due to its slow pace, Level 1 charging is best suited for plug-in hybrid electric vehicles (PHEVs) with smaller batteries or for EV owners who drive very few miles daily. It also serves as a reliable backup option or for use when visiting friends or family.
Level 2 Charging: The Dedicated Home Solution
What is Level 2 Charging?
Level 2 is the standard for dedicated home charging. This method uses a 240-volt circuit, similar to what powers a large appliance like an electric oven or clothes dryer. A Level 2 charger, also called an Electric Vehicle Supply Equipment (EVSE), must be professionally installed. This equipment delivers power to the EV much faster and more efficiently than a standard outlet.
Why It’s the Standard for Home Use
Level 2 is the recommended electric vehicle charging solution for most owners because it aligns with the daily needs of driving an EV. It offers a practical and powerful way to charge an electric car overnight. The primary advantages include:
- Commodité : An EV can receive a full charge in approximately 4 to 8 hours, ensuring it is ready every morning.
- Fiabilité : It provides a consistent and faster charging rate, which helps reduce range anxiety for daily commuters.
- La sécurité : Dedicated circuits and built-in safety features in Level 2 units reduce the electrical strain on household wiring.
Option 1: How to Charge an EV with a Wall Socket
Using a standard wall socket, known as Chargement de niveau 1, is the most accessible way to charge an EV. This method requires no special installation and uses equipment that often comes with the vehicle. It serves as a fundamental charging solution, especially for new owners or as a reliable backup.
The Equipment You Need
Using the Mobile Connector
Most electric vehicles include a cordon de charge pour téléphone portable. This portable device is the key piece of equipment for Level 1 charging. One end of the cord features a standard three-prong plug for a wall outlet. The other end has a J1772 connector (or a Tesla-specific connector) that plugs directly into the EV. The cord’s internal components manage the flow of electricity safely between the house and the vehicle.
Plugging into a 120-Volt Outlet
The mobile connector plugs into a common 120-volt household outlet. In North America, this is typically a NEMA 5-15 receptacle. An owner can identify this outlet by its specific design:
- Two flat, parallel vertical slots.
- A third, rounded hole for the ground pin.
The ground pin is a critical safety feature. It is longer than the other blades to ensure the EV is grounded before electricity begins to flow. This standard outlet is rated for 15 amps at 125 volts, which limits the power it can safely deliver over long periods.
Pros of Level 1 Charging
No Installation Cost
The most significant advantage of Level 1 charging is the absence of installation costs. An owner can start charging their EV the day they bring it home without needing to hire an electrician or modify their home’s wiring. This makes it an excellent entry point for electric vehicle ownership.
Ultimate Portability
The mobile connector is compact and easy to transport. An owner can store it in the trunk and have the ability to charge anywhere a standard outlet is available. This portability provides peace of mind during trips to visit friends or family, ensuring a charging option is always on hand.
Cons of Level 1 Charging
Vitesse de chargement très lente
The primary drawback of Level 1 charging is its extremely slow speed. The limited power from a 120-volt outlet translates to a minimal range gain.
An EV typically adds only about 3 to 5 miles of range for every hour it is plugged in. An eight-hour overnight charge might only add 30 to 40 miles of range, which is often insufficient to replenish the battery after a typical day of driving.
This slow rate makes it impractical as a primary charging solution for most drivers.
Potential Electrical Strain
Relying on a standard outlet to charge an electric car can place a significant and prolonged load on a home’s electrical circuit. An EV draws much more power than a typical household appliance. This sustained high-power draw can lead to several issues:
- Overheating Wires: The circuit’s wiring may not be designed for such a heavy, continuous load, creating a potential fire hazard.
- Circuit Breaker Failure: The constant strain can cause circuit breakers to trip frequently or fail over time.
For these reasons, many experts advise using Level 1 charging only for emergencies or for plug-in hybrids with much smaller batteries.
Option 2: The Benefits of Level 2 Electric Car Charging at Home
While Level 1 charging offers a basic solution, a professionally installed Level 2 charger represents the gold standard for home charging. It transforms the ownership experience by providing superior speed, safety, and intelligence. For the daily driver, the benefits of a dedicated Level 2 unit are substantial.
Faster and More Convenient Charging
The most immediate advantage of a Level 2 charger is its significant speed improvement. This enhancement makes the process of charging an EV seamless and integrated into a daily routine.
Get a Full Charge Overnight
A Level 2 charger operates on a 240-volt circuit, delivering power much more rapidly than a standard outlet. While a Level 1 charger adds only 3-5 miles of range per hour, a typical 7.4 kW Level 2 home charger adds approximately 25-30 miles of range for every hour it is connected.
This dramatic increase in speed means an EV owner can replenish a full battery in just 4 to 8 hours. A driver can arrive home, plug in their vehicle, and wake up to a fully charged EV every morning.
Reduce Range Anxiety
The reliability of a full charge each day directly combats range anxiety. An owner no longer needs to worry if their vehicle has enough power for an unplanned trip or a long commute. The convenience of starting every day with the maximum possible range provides confidence and peace of mind, making the transition to an electric lifestyle smooth and worry-free.
Enhanced Safety and Reliability
Dedicated Level 2 chargers are engineered with safety as a top priority. They provide a more robust and secure connection than a standard household outlet, protecting both the vehicle and the home’s electrical system.
Dispositifs de sécurité intégrés
Level 2 charging units come equipped with multiple safety protocols that are not present in a standard wall socket. These features include:
- Ground Fault Protection: The unit immediately shuts off power if it detects an electrical fault, preventing shock hazards.
- Contrôle de la température : Internal sensors monitor heat levels and can reduce power or shut down to prevent overheating.
- Secure Connection: The charger communicates with the EV to ensure the plug is properly seated before electricity begins to flow.
Reduces Wear on Household Wiring
A Level 2 charger is installed on a dedicated 240-volt circuit, just like an electric stove or dryer. An electrician installs wiring appropriately sized for the continuous high-power draw required to charge an electric car. This professional installation eliminates the risk of overloading a standard household circuit, which can cause wires to overheat and circuit breakers to fail over time.
Access to Smart Features
Modern Level 2 chargers offer a suite of “smart” capabilities that enhance the electric car charging experience. These features provide greater control, économies de coûts, and insight into energy consumption.
Schedule Charging for Off-Peak Rates
Many utility companies offer Time-of-Use (TOU) electricity plans with lower rates during off-peak hours, typically late at night. Smart chargers allow an owner to schedule charging sessions to begin automatically during these low-cost periods. By shifting energy consumption, an EV owner can achieve annual savings ranging from $350 to $700, depending on their utility plan and driving habits.
Monitor Energy Usage via Apps
Most smart chargers connect to a home’s Wi-Fi network and pair with a smartphone app. These applications give the owner complete remote control and visibility. For example, apps from manufacturers like Tesla, Wallbox, et CITA allow users to:
- Start, pause, or stop charging sessions remotely.
- Monitor real-time charging status and energy usage.
- View charging history and associated costs.
- Receive notifications when the EV is fully charged.
This level of control ensures an owner can manage their vehicle’s energy needs efficiently from anywhere.
How to Choose the Right Level 2 Home Charger
Selecting the right Level 2 EV home charger involves considering power, convenience, and smart technology. An owner must evaluate their vehicle’s needs and their home’s electrical setup to find the perfect match. Leading providers like TPSON offer technologically advanced solutions to meet these diverse requirements.
Power Output (kW) Explained
Le puissance de sortie of a charger, measured in kilowatts (kW), directly determines how quickly it can charge an electric car. A higher kW rating delivers more power, resulting in a faster charging session.
Common Power Levels (7.4kW, 11kW)
Most home chargers operate at 7.4kW or 11kW. A 7.4kW unit is the most common choice for home charging. It runs on a single-phase electrical supply and can fully charge most EVs overnight. An 11kW charger requires a three-phase supply, which is less common in residential properties but offers even faster speeds for compatible vehicles.
Match Your Car’s Capabilities
A charger’s power is only one part of the equation. Every EV has a taux de charge maximal determined by its onboard charger. A home ev charger with a higher output will not charge an EV faster than the vehicle’s limit.
For example, if a car’s maximum AC charging rate is 7.4kW, using an 11kW EV home charger will not speed up the process; the car will still only draw 7.4kW. An owner should check their vehicle’s specifications to choose a charger that aligns with its capabilities.
The following chart shows the varying charging performance across different EV models, highlighting that each vehicle has unique peak and average charging speeds.

Chargeurs attachés et chargeurs non attachés
An owner must also decide between a tethered or untethered charger design.
Tethered: Attached Cable
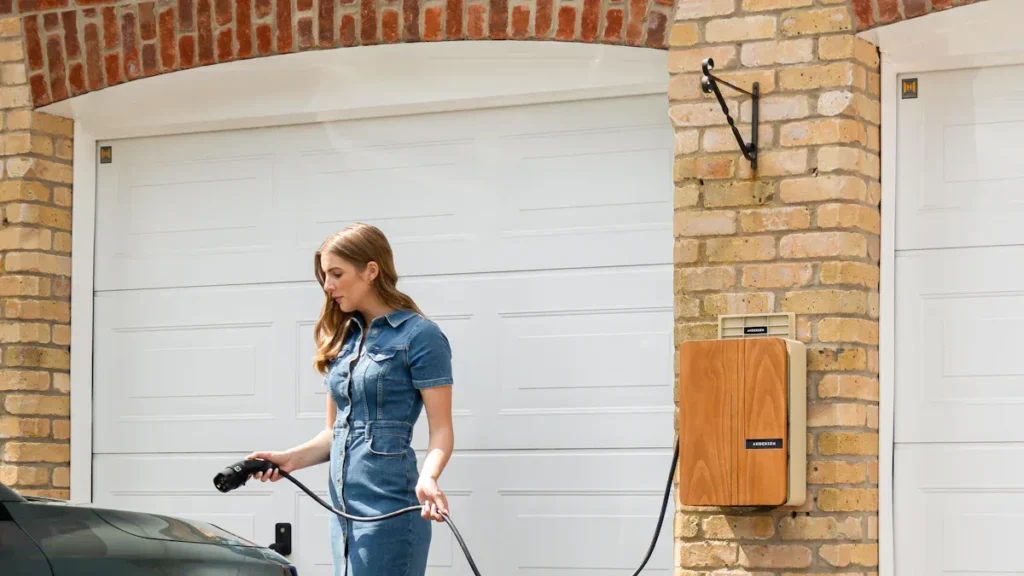
A tethered charger has a charging cable permanently attached to the unit. This design offers maximum convenience. The owner simply parks their EV, grabs the cable, and plugs it in. There is no need to retrieve a cable from the trunk.
Untethered: Use Your Own Cable
An untethered charger features a universal socket instead of an attached cable. This requires the owner to use the portable cable that came with their EV. This option provides greater flexibility, as it can accommodate any vehicle with a compatible plug type.
Must-Have Smart Features
Modern chargers offer intelligent features that optimize the charging experience, enhance safety, and reduce costs.
Contrôle du Wi-Fi et des applications
Smart chargers connect to a home’s Wi-Fi, allowing an owner to manage charging through a smartphone app. User surveys show that owners highly value features like remote start/stop, scheduled charging to take advantage of off-peak electricity rates, and real-time energy monitoring.
Gestion dynamique de la charge
Gestion dynamique de la charge is a critical safety feature for the modern home. This technology continuously monitors the home’s total electricity consumption. If it detects that the electrical circuit is nearing its capacity—for instance, when an oven and air conditioner are running—it automatically reduces the power going to the EV to prevent an overload. This intelligent power distribution prevents tripped circuit breakers and avoids the need for costly electrical panel upgrades.
The Installation Process for Your Home Charger

Installation home charge points is a straightforward process when broken down into clear steps. From choosing the right hardware to the final professional setup, each stage ensures a safe and efficient system. This process guarantees that an owner can reliably charge an electric car at home.
Step 1: Select Your Charger
The first step is selecting an chargeur de VE domestique gratuit that matches the owner’s vehicle and lifestyle. An owner should consider factors like charging speed, smart features, and budget. Several models are highly regarded for their performance and reliability.
- KD Energy 11kW Home EV Charger: Known for its fast charging and durable, weatherproof design.
- ChargePoint Home Flex: Praised for its powerful smart features and user-friendly app.
- JuiceBox 40: A reliable and affordable option with excellent energy tracking.
- Wallbox Pulsar Plus: Appreciated for its compact size and smart app integration.
- Connecteur mural Tesla: The ideal choice for Tesla owners, offering seamless compatibility.
Step 2: Find a Qualified Electrician
Once a charger is chosen, the next step is to find a qualified professional for the installation. This is not a DIY project; it requires specialized knowledge to ensure safety and compliance.
The Importance of Certified Installers
Hiring a certified installer is critical. A qualified electrician possesses specific training for EV charger installations, ensuring the work meets all safety standards. Key qualifications include:
- A Level 3 Electrotechnical Qualification.
- Certification in the 18th Edition Wiring Regulations.
- Specialist training for installing EV charging equipment.
These credentials guarantee the installer understands how to handle high-voltage systems and can configure the charger safely within the home’s electrical infrastructure. Using a certified professional protects the EV, the home, and the warranty of the charging unit.
How to Get Installation Quotes
An owner should obtain at least three quotes from different certified electricians. Many charger manufacturers, including technologically advanced providers like TPSON, maintain a network of approved installers on their websites. Contacting these recommended professionals is an excellent starting point. Each quote should provide a detailed breakdown of costs for labor and materials.
Step 3: The On-Site Assessment
Before installation day, the electrician will conduct an on-site assessment. This visit is essential for planning the installation and identifying any potential challenges with the property’s electrical system.
Evaluating Your Electrical Panel
The electrician’s first task is to inspect the main electrical panel (or main electrical panel).
The professional will assess the home’s existing electrical capacity to determine if there is enough spare power to support the new EV charger. They will identify other heavy loads, like an electric shower or HVAC system, to ensure the circuit will not be overloaded.
If the panel lacks sufficient capacity, the electrician will recommend necessary upgrades.
Deciding on the Best Location
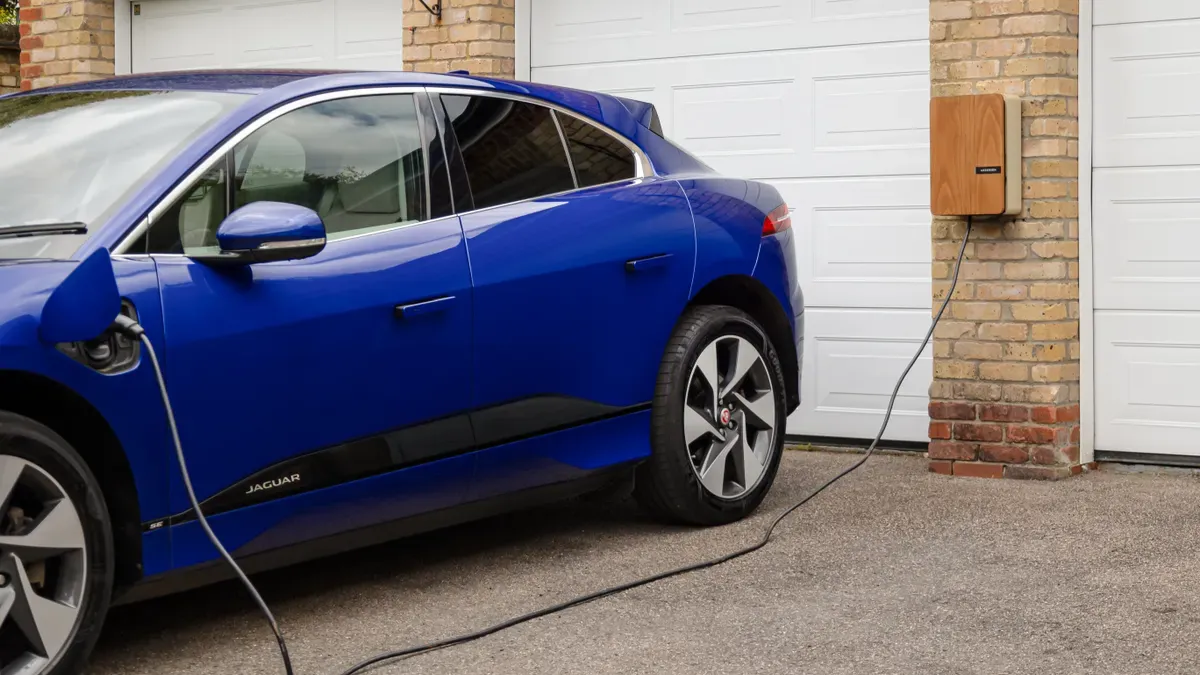
Next, the electrician helps the owner choose the best location for the charger. The ideal spot is typically in a garage or on an exterior wall close to the usual parking spot for the EV. The professional plans the most direct and safe cable route from the electrical panel to the charger, minimizing disruption and ensuring the final setup is both convenient and secure.
Step 4: What to Expect on Installation Day
With the on-site assessment complete, installation day is typically a smooth and efficient process. A standard Level 2 charger installation usually takes a qualified electrician between three to four hours from start to finish. The owner can expect a professional and methodical workflow to ensure the system is safe, compliant, and ready for use.
The electrician will perform several key tasks during the visit. The process ensures a secure and robust connection from the home’s electrical supply to the vehicle.
- Mounting the Charger: The electrician begins by securely fitting the EV charger unit onto a permanent structure. This is often a garage wall or an exterior brick surface near the parking space.
- Running the Cable: A dedicated power cable is run from the main electrical panel to the charger’s location. A standard installation typically includes up to 15 meters of cable. The electrician will route it neatly, sometimes drilling a small hole through a wall and using plastic trunking to conceal interior wiring.
- Installing Circuit Protection: The professional installs necessary safety devices at the electrical panel. This often involves adding a new, dedicated circuit breaker inside a small main electrical panel specifically for the EV charger. This isolates the charger from the rest of the home’s circuits.
- Adding Surge Protection: A Surge Protection Device (SPD) is installed. This crucial component protects the expensive charging equipment and the vehicle’s onboard electronics from potential damage caused by voltage spikes on the electrical grid.
- Testing and Certification: After the physical installation, the electrician conducts a series of tests. These checks confirm the charger operates correctly and safely. The owner will then receive an Electrical Installation Certificate (EIC) as formal documentation that the work meets all regulatory standards.
The entire job revolves around three core phases. First, the electrician confirms the assessment. Second, they complete the physical installation of the 240-volt circuit and charging station. Finally, they test the system to ensure it operates safely and complies with all local codes.
Before leaving, the electrician will provide a full demonstration of the new charger. They will show the owner how to operate it, explain any smart features, and assist with connecting the unit to its smartphone app. This final step ensures the owner feels confident and ready to begin charging their EV at home. 🔌
Costs and Incentives for Home EV Charging
An owner can make recharge à domicile more affordable by understanding the total investment and available financial incentives. The initial expense for an EV setup involves the charger unit and professional installation, but various programs can significantly reduce this upfront cost.
Ventiler le coût total
The total cost is a combination of the hardware price and the fee for professional installation services. An owner should budget for both components.
Chargeur Prix unitaire
The price of the charger itself varies widely. Costs depend on the brand, power output (kW), and smart features. Basic models are more affordable, while chargers with advanced app controls and dynamic load management command a higher price.
Frais d'installation professionnelle
Professional installation is a critical part of the budget for electric car charging. The total cost to purchase and install a unit typically ranges from $800 to over $2,000 in the U.S., depending on the complexity of the job. A standard installation fee often includes:
- Labor costs for a qualified electrician, often around $300 or more.
- Jusqu'à 15 mètres de câblage sécurisé entre le tableau électrique et le chargeur.
- Un nouveau dispositif de coupure de sécurité et un disjoncteur.
- Du matériel tel que des supports de fixation et des conduits.
Remarque : Si le tableau électrique d'une maison nécessite une mise à niveau pour supporter la nouvelle charge, les coûts d'installation seront plus élevés. Un propriétaire doit toujours obtenir un devis détaillé avant le début des travaux.
Comment Trouver des Remises et des Crédits d'Impôt
Les programmes gouvernementaux et des services publics offrent des incitations financières pour encourager l'adoption de points de charge domestiques. Ces remises et crédits peuvent rendre l'investissement bien plus abordable pour un propriétaire de véhicule électrique.
Crédits d'impôt fédéraux
Le gouvernement fédéral américain offre un crédit d'impôt pour les équipements de recharge de véhicule électrique éligibles. 30 % du coût, jusqu'à un maximum de 1 000 $. Cette incitation est un crédit non remboursable déduit des impôts fédéraux dus. Cependant, l'éligibilité est souvent limitée aux propriétaires résidant dans des zones de recensement à faible revenu ou non urbaines.
Remises accordées par les États et les collectivités locales
De nombreux gouvernements étatiques et locaux proposent leurs propres remises pour réduire le coût d'achat et d'installation d'un chargeur. Ces programmes varient selon la localisation, un propriétaire doit donc consulter les sites web de l'agence énergétique de son État et de sa municipalité pour connaître les incitations disponibles.
Incitations des Compagnies de Services Publics
Les compagnies locales de services publics sont une source principale d'économies. De nombreux fournisseurs proposent des programmes conçus pour promouvoir une utilisation efficace de l'énergie pour un VE. Les incitations courantes comprennent :
- Des remises directes qui couvrent une partie du coût du chargeur et de l'installation.
- Des tarifs spéciaux Temps d'Utilisation (TOU) avec des prix de l'électricité réduits pour la recharge nocturne.
- Une compensation pour le renvoi de l'électricité non utilisée vers le réseau grâce à la technologie véhicule-réseau (V2G).
Un propriétaire doit contacter son fournisseur d'électricité pour découvrir quels programmes sont disponibles dans sa région. 💰
Un chargeur domestique de niveau 2 pour VE installé professionnellement est la méthode supérieure pour recharger un VE à domicile. Il offre le meilleur équilibre entre vitesse, sécurité et commodité pour les propriétaires de véhicules électriques. Bien qu'une sortie standard puisse recharger un VE, elle est trop lente pour la plupart des besoins de recharge domestique quotidiens. L'écart de performance est clair.

Cette solution garantit qu'un VE est toujours prêt. Un propriétaire peut recharger sa voiture électrique en toute confiance pendant la nuit. Recherchez toujours les incitations financières pour réduire le coût initial. ✅
FAQ
Puis-je installer moi-même une borne de niveau 2 ?
Non. Un électricien qualifié doit installer un chargeur de niveau 2. Le processus implique un câblage haute tension et nécessite des connaissances professionnelles. Cela garantit une installation sûre, conforme aux normes électriques et qui n'annule pas la garantie du chargeur. ⚡
Quel est le coût de recharge d’un VE à domicile ?
Le coût dépend des tarifs locaux de l'électricité et du modèle de VE. Un propriétaire peut calculer le total en multipliant le prix de son service public par kilowattheure (kWh) par la quantité d'énergie ajoutée à la batterie pendant une session de recharge. 💲
Un chargeur de VE fonctionne-t-il sous la pluie ?
Oui. Les chargeurs de VE domestiques sont spécifiquement conçus pour une utilisation extérieure et sont étanches. Ils incluent des dispositifs de sécurité robustes qui les protègent de l'eau et de l'humidité, les rendant totalement sûrs à utiliser sous la pluie ou la neige. 🌧️
Ai-je besoin d'un compteur spécial pour la recharge de véhicule électrique ?
Un compteur spécial n'est pas requis pour la recharge de véhicule électrique. Cependant, certaines compagnies de services publics proposent des compteurs Temps d'Utilisation optionnels. Ceux-ci peuvent aider un propriétaire à économiser de l'argent en suivant la consommation d'énergie pour bénéficier de tarifs de recharge hors pointe réduits. ⏱️
N'importe quel VE peut-il utiliser n'importe quel chargeur de niveau 2 ?
La plupart des VE en Amérique du Nord utilisent le connecteur standard J1772, ce qui les rend compatibles avec la plupart des chargeurs de niveau 2. Les véhicules Tesla nécessitent un adaptateur pour utiliser des chargeurs non-Tesla, mais cet adaptateur est généralement fourni avec le véhicule. 🔌