

Electric vehicle ownership is rapidly expanding across the United States, with fully electric vehicles reaching a record 7.9% market share in Q3 2023. This growth makes a home شاحن السيارة الكهربائية an increasingly valuable addition for new owners. To install EV charger hardware, you must first select a unit compatible with your vehicle and home’s electrical system. Many الشركات المصنعة لشاحن السيارة الكهربائية offer a variety of حلول شحن السيارات الكهربائية, ranging from powerful, wall-mounted units to simple شواحن السيارات الكهربائية المحمولة. A licensed electrician must perform the installation of the شاحن السيارة الكهربائية. This professional ensures the installation is safe and meets all electrical codes. The process typically involves assessing your home’s electrical panel capacity and running a new, dedicated circuit for the charging station.
First, Understand Your Home EV Charger Options
An EV owner needs to understand the available خيارات الشحن before selecting a unit. The choice directly impacts charging speed, installation complexity, and overall cost. The industry categorizes electric vehicle charging into three main levels. Each level offers different power outputs and use cases.
EV Charger Levels Explained
The primary difference between charging levels is the ناتج الطاقة, which determines how quickly an EV’s battery can be refilled.
شحن المستوى 1 (120 فولت)
Level 1 charging uses a standard 120-volt household outlet, the same kind used for a phone or laptop. This method requires no special installation. The EV owner simply uses a portable cord set that comes with most electric vehicles. However, it is extremely slow. A Level 1 charger adds only about 3 to 7 miles of range per hour of charging. A full charge can take over 22 hours, making it impractical for drivers with long daily commutes. It serves best as a backup option or for plug-in hybrid vehicles with smaller batteries.
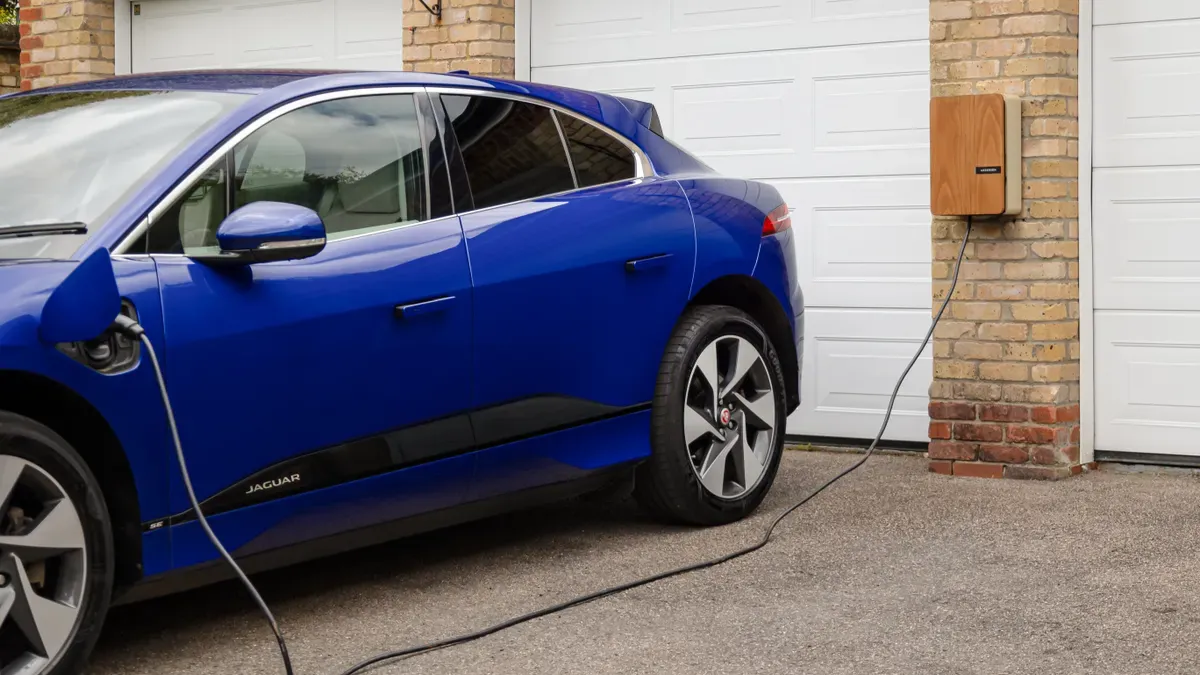
شحن المستوى 2 (240 فولت)
Level 2 is the most common and practical solution for a home EV charger. These units use a 240-volt circuit, similar to an electric dryer or oven. This higher voltage allows for much faster charging speeds, typically adding 10 to 75 miles of range per hour. A full charge for a typical EV battery can be completed in just a few hours, usually overnight. This level requires professional installation of a dedicated circuit and the charging station itself.
الشحن السريع بالتيار المستمر (المستوى 3)
DC Fast Charging, or Level 3, provides the quickest charging available. These powerful stations can charge an EV battery to 80% in under 20 minutes. They achieve this by converting AC power to DC power externally and delivering it directly to the battery, bypassing the car’s slower onboard converter. Due to their extremely high power output (30-400+ kW) and immense cost, DC Fast Chargers are not installed in homes. They are found exclusively at public charging stations along highways and in urban centers.
Why Level 2 is the Standard for Home Charging
For most EV owners, a Level 2 charger provides the ideal balance of speed, cost, and convenience for daily use.
Faster Charging Speeds
The most significant advantage of Level 2 charging is its speed. While a Level 1 charger might take over 22 hours to fill a بطارية 60 كيلوواط/ساعة, a typical 7.4kW Level 2 charger can do the same job in about 8 hours. This ensures a full battery every morning, even after a long day of driving. The difference in performance is substantial.

Increased Convenience and Efficiency
A Level 2 charger transforms the EV ownership experience. It eliminates range anxiety for daily driving by providing a reliable and quick overnight charge. This convenience ensures the vehicle is always ready for the next day’s commute or errands. The efficiency of Level 2 charging means less time waiting and more time driving, making it the definitive standard for residential installations.
الخطوة 1: تقييم النظام الكهربائي في منزلك
An EV charger installation is a significant electrical project. Before purchasing any hardware, a homeowner must first assess their home’s electrical system. This crucial first step determines if the existing infrastructure can safely support the added load of a Level 2 charger. A thorough evaluation prevents potential hazards and costly surprises down the line.
Evaluate Your Electrical Panel (Breaker Box)
The electrical panel, or breaker box, is the heart of a home’s electrical system. It distributes power to all circuits. An electrician will inspect it to confirm its capacity and available space.
Checking Your Main Breaker Amperage
The main breaker is the largest switch in the panel, usually located at the top or bottom. This breaker shows the total amperage your home can draw from the grid. The number printed on it (e.g., 100 أمبير, 150A, 200A) indicates the panel’s total capacity. This value is a critical factor. It helps determine if the panel can handle the continuous load of an EV charger in addition to the home’s existing appliances.
Identifying Space for a New 240V Breaker
A Level 2 charger requires a dedicated 240-volt circuit. This circuit needs a new “double-pole” breaker, which takes up two adjacent physical slots in the panel. An electrician will check for two open, side-by-side slots. If the panel is full, they may be able to consolidate existing circuits using “tandem” breakers to free up space. In some cases, a small sub-panel might be a viable solution.
Determine Your Home’s Service Capacity
A home’s service capacity refers to the total amount of electricity supplied by the utility company. This capacity must be sufficient for both the home’s current needs and the new EV charger.
Understanding 100A vs. 200A Service
Most modern homes have a 200-amp service, which is generally sufficient for adding an EV charger. Many older or smaller homes, however, may only have 100-amp or even 60-amp service. A 100-amp service can often support an EV charger, but it depends heavily on the home’s other electrical loads, such as electric heating or a hot tub. An electrician must confirm the service can handle the increased demand safely.
When a Service Panel Upgrade is Necessary
A service panel upgrade becomes necessary if the existing panel lacks the capacity for the new charger. Signs that an upgrade is needed include a low-amperage main breaker (e.g., 60A or 100A in a home with high electrical usage) or a physically full panel with no room for a new 240V breaker. This is a more involved and costly project but ensures the home’s electrical system is safe and future-proof.
The Importance of a Professional Load Calculation
A professional load calculation is a non-negotiable step performed by a licensed electrician. It provides a detailed analysis of a home’s total electrical demand to ensure the system is not overloaded.
What is an Electrical Load Calculation?
An electrical load calculation is a systematic process defined by the National Electrical Code (NEC). An electrician inventories all major electrical loads in the home to determine the total power consumption. This includes fixed appliances and potential future loads. The calculation accounts for items such as:
- Refrigerator and oven
- HVAC system
- Water heater
- Dishwasher and microwave
- Lighting and general outlets
السلامة أولاً: This calculation is not a simple estimate. It is a formal procedure that ensures the new EV charger circuit will not exceed the safe capacity of the electrical panel or the home’s main service.
Why This Step is Critical for Safety
This calculation is critical for preventing dangerous overloads. Adding a high-power device like an EV charger without a proper assessment can trip breakers, damage appliances, or, in the worst case, cause an electrical fire. A professional load calculation guarantees that the installation complies with all safety codes. It protects the homeowner, their property, and their new electric vehicle.
Step 2: Choose the Right Home EV Charge Point

After confirming the home’s electrical system can support a new load, the next step is selecting the ideal home EV charging station. The market offers a wide array of options. A buyer must consider power output, physical design, and smart features to find the best fit for their vehicle and lifestyle.
خرج الطاقة وسرعة الشحن
The power output of a charger, measured in amperes (A), directly determines how quickly it can replenish an EV’s battery.
Amperage Options (16A to 48A)
Level 2 chargers come in various amperage ratings, typically from 16A to 48A. A higher amperage delivers more power, resulting in faster charging. The speed is often measured in miles of range added per hour.
| الأمبيرية | Miles of Range Added Per Hour (Approx.) |
|---|---|
| 16A | ~15 miles |
| 32A | ~30 miles |
| 48A | ~45 miles |
A 32A or 40A charger is a popular choice for most households. It provides a substantial speed increase over Level 1 charging without requiring a major electrical service upgrade in most cases.
Matching Charger to Your Car’s Onboard Charger
An EV has an onboard charger that converts AC power from the wall into DC power for the battery. This component has a maximum acceptance rate. A car with a 7.4 kW onboard charger cannot charge any faster, even if connected to an 11 kW (48A) station. An owner should select a home ev charger that matches or slightly exceeds their vehicle’s maximum AC charging rate to ensure optimal performance without overspending on unneeded power.
Physical Charger Types
Chargers also differ in their physical installation and cable configuration. These choices affect convenience, flexibility, and installation complexity.
Hardwired vs. Plug-In (NEMA 14-50)
A homeowner can choose between a hardwired unit or a plug-in model.
- سلك صلب: An electrician wires the charger directly to the circuit. This permanent installation is often required for higher-amperage chargers (above 40A) and can be more reliable. It avoids potential issues with فصل مزعج, which can occur when a plug-in charger’s internal GFCI conflicts with a required GFCI breaker on the outlet.
- Plug-In: These chargers use a heavy-duty plug, like a NEMA 14-50. This offers flexibility, as the owner can unplug the unit and take it with them. It is an excellent option for renters or those who may move.
Tethered (Attached Cable) vs. Untethered (Socket)
This choice comes down to convenience versus aesthetics.
- Tethered: The charging cable is permanently attached to the unit. This is highly convenient; the driver simply parks and plugs in.
- Untethered: The unit has a socket, and the driver uses a separate cable (often the one stored in the car’s trunk) to connect. This provides a cleaner look when not in use.
الميزات الذكية والاتصال الذكي
أجهزة الشحن الحديثة من مزودي خدمات مثل TPSON offer advanced features that enhance the charging experience and can save money.
Wi-Fi, App Control, and Scheduling
Smart chargers connect to a home’s Wi-Fi network. This allows the owner to monitor and control charging sessions via a smartphone app. A key benefit is scheduling. An owner can program the charger to begin charging during off-peak hours when electricity rates are lowest.
Utility Rate and Demand Response Integration
Some advanced chargers can integrate directly with utility company energy tariffs. The charger’s software automatically optimizes the charging schedule to use the cheapest electricity available. This ensures the car is ready by a set time while minimizing cost.
Connecting to Home Solar Systems
For homes with solar panels, certain smart chargers can prioritize using surplus solar energy. The system directs free, clean power from the sun into the EV’s battery. This maximizes self-consumption of solar energy and further reduces reliance on the grid.
Step 3: Plan the EV Charger Installation Location

Strategic planning of the charger’s location is essential for daily convenience and installation efficiency. A homeowner should work with their electrician to identify the optimal spot. This decision impacts both the cost of the project and the ease of future charging sessions.
Selecting the Best Spot for Your Charger
Finding the best place to تركيب شاحن كهربائي involves balancing accessibility, safety, and the vehicle’s design.
Proximity to Your Parking Space
The charger should be installed as close as possible to where the EV is normally parked. This ensures the charging cable can reach the vehicle’s port comfortably without being stretched or creating a tripping hazard. Most standard charging cables are around 18 to 25 feet long. A well-placed unit makes the daily routine of plugging in effortless.
Considering Your Car’s Charging Port Location
Electric vehicles have charging ports in different locations—some are on the front, others on the side, and some at the rear. The homeowner must consider their specific vehicle’s port location when choosing a wall for the charger. This prevents the need to park in an awkward position or drape the cable over the vehicle.
Indoor (Garage) vs. Outdoor Installation
The choice between an indoor or outdoor installation depends on the property layout and owner preference.
- Indoor (Garage): A garage is often the best place to install an ev charger. It protects the unit from weather, potential vandalism, and extreme temperatures, which can extend its lifespan. Proper ventilation is still important to dissipate any heat generated during charging.
- Outdoor: If a garage is not available, an outdoor installation is a perfectly viable option. In this case, the owner must select a charger with a high Ingress Protection (IP) rating, such as IP65. This rating ensures the unit is sealed against dust and rain. The charger and its wiring must also be UV-resistant to prevent sun damage.
تخطيط مسار الأسلاك
An electrician will map out the most efficient path for the electrical cable, which is a critical part of the installation plan.
Path from Breaker Panel to Charger
The ideal wiring route is the shortest and most direct path from the electrical panel to the charger location. A shorter cable run is less complex and reduces material and labor costs. The electrician will identify a route that minimizes disruption to finished walls and ceilings.
Running Cable Through Walls, Attics, or Conduit
To achieve a clean and safe installation, an electrician runs the heavy-gauge cable through concealed spaces.
For indoor installations, the cable can often be routed through walls, attics, or basements. For outdoor runs or surface mounting in a garage, the cable must be protected inside a durable conduit. This protects the wiring from physical damage and moisture, ensuring compliance with all local electrical codes.
Planning for Data Cable if Needed
Some smart chargers may require a hardwired data connection (Ethernet cable) for reliable communication if the home’s Wi-Fi signal is weak at the charging location. A homeowner should discuss this possibility with the installer during the planning phase to ensure all necessary wiring is run at the same time.
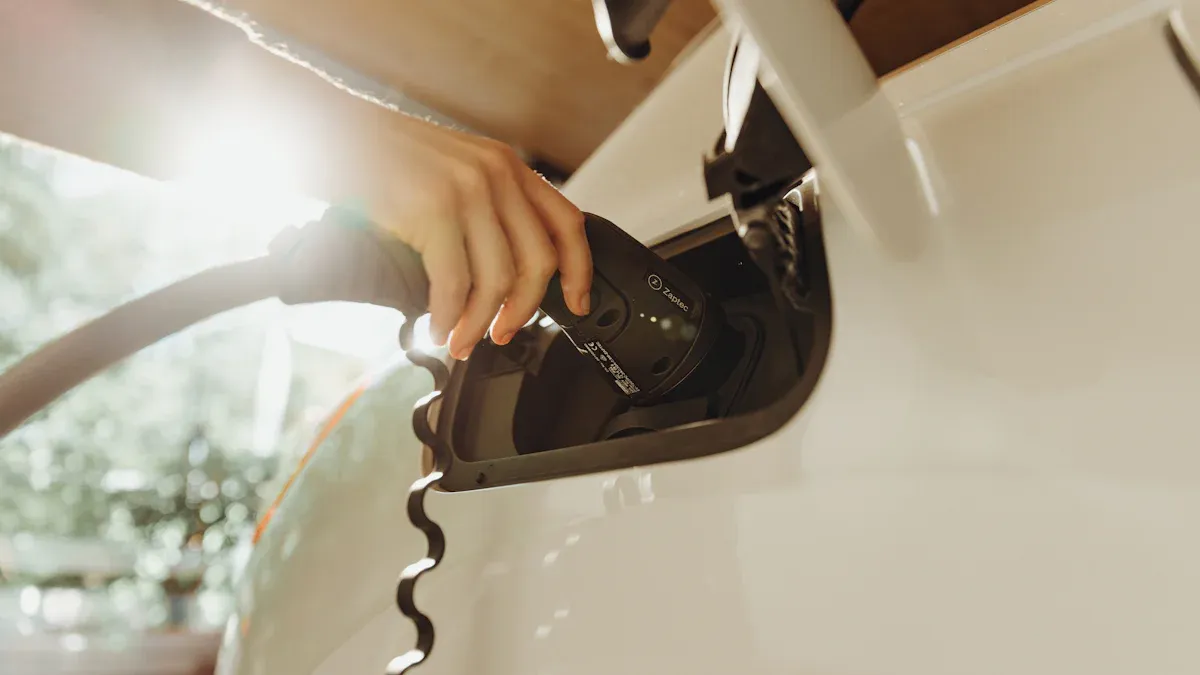
Step 4: Hire a Professional to Install EV Charger
While some home projects are suitable for a DIY approach, an تركيب شاحن السيارة الكهربائية is not one of them. The high-voltage electrical work requires specialized knowledge and skills. A homeowner must hire a licensed professional to ensure the project is completed safely and correctly.
Why You Must Use a Licensed Electrician
Using a qualified electrician is a non-negotiable requirement for this type of installation. It protects the homeowner, their property, and their investment.
ضمان السلامة والامتثال للقوانين
A licensed electrician understands the complex requirements of the National Electrical Code (NEC). They ensure the installation uses the correct wire gauge, breaker type, and safety devices like a GFCI. This professional work guarantees the system operates safely and passes any required municipal inspections, preventing dangerous electrical faults.
The Dangers of a DIY Installation
Attempting to install ev charger hardware without proper training is extremely hazardous. The risks associated with improper work are severe and can have catastrophic consequences.
- Electrical Shock: Direct contact with live wires can cause serious injury or even death.
- Fire Hazards: Incorrect wiring, poor connections, or an overloaded circuit can cause components to overheat and start a fire.
- انتهاكات القانون: A DIY ev charger installation will not meet local building codes, leading to fines and the need for a complete rework by a professional.
Protecting Your Home and EV Warranty
Most EV and charger manufacturers require professional installation to keep their warranties valid. An improper installation can damage the vehicle’s charging system or the charger itself, and the manufacturer will not cover the repairs.
Furthermore, if an electrical fire or other damage occurs due to a DIY installation, a homeowner’s insurance policy may deny the claim. A certified installation provides the necessary documentation to protect these crucial warranties and policies.
How to Find and Vet an Installer
Finding the right electrician is a critical step. A homeowner should look for professionals with specific experience in this field.
Searching for Certified EV Installers
Many charger manufacturers maintain a network of preferred or certified installers. A homeowner can often find a list of qualified local electricians on the manufacturer’s website. These professionals have received specific training on that brand’s products, ensuring a high-quality installation.
الأسئلة التي يجب طرحها قبل التوظيف
Before committing to an electrician, a homeowner should ask several key questions:
- Do you have experience with ev charger installation projects?
- هل أنت مرخص ومؤمن عليك للأعمال الكهربائية السكنية؟
- Can you provide a detailed, itemized quote?
- Will you handle the permitting and inspection process?
- What is the warranty on your workmanship?
Verifying Licenses, Insurance, and References
A homeowner should always verify an electrician’s credentials. They can ask for a copy of the electrician’s state license and certificate of insurance. Checking online reviews and asking for references from previous clients provides additional confidence in their ability to perform a safe and reliable installation.
Step 5: The Installation Day and Final Inspection
With the planning complete and a professional hired, the day of the تركيب شاحن السيارة الكهربائية marks the final step in the process. Knowing what to expect can make the day go smoothly. The process culminates with a final inspection to certify the work is safe and compliant with all regulations.
ما يمكن توقعه أثناء التركيب
A professional ev charger installation is a systematic process. The electrician follows a clear set of steps to ensure a safe and efficient outcome. A standard installation typically takes a few hours from start to finish.
Electrician’s Workflow: On the day of the installation, the electrician will typically follow a structured plan:
- Final Site Review: The electrician arrives and confirms the agreed-upon location for the charger and the planned route for the electrical cable. They will verify the charger is placed where a car cannot accidentally hit it.
- Cable Route Execution: They plan and execute the “cable run” from the breaker box to the charger. The electrician will discuss any sections of visible cable with the homeowner.
- Fuse Box Preparation: The professional inspects the breaker box to confirm the spare slot for the new circuit. If the panel is full, they will install a small sub-panel as previously discussed.
- التركيب المادي: Once all details are confirmed, the electrician begins the physical work of drilling, mounting the hardware, and clipping the cable securely in place.
Installing the New Dedicated Circuit and Breaker
The first major electrical task is creating the new circuit. For safety, the electrician shuts off all power to the home at the main breaker. They then install a new double-pole breaker into the two available slots in the electrical panel. This breaker is specifically rated for the amperage of the new dedicated EV charger.
Mounting the Charging Unit Securely
Next, the electrician securely mounts the charging unit to the wall. They will use heavy-duty fasteners to ensure the charger is stable and can withstand the repeated plugging and unplugging of the heavy charging cable. The height and location will match the plan, ensuring easy access from the vehicle’s charge port.
Running and Securing the Power Cable
The electrician runs the heavy-gauge power cable from the breaker panel to the charger’s location. They follow the pre-planned route through walls, attics, or crawlspaces. For any exposed sections, especially in a garage or outdoors, the cable is protected inside a rigid conduit. This protects the wiring from damage and moisture, a critical step for a safe installation.
Final Connections and System Testing
With the main components in place, the electrician makes the final connections. They wire the power cable to the charging unit and double-check all connections in the panel. After restoring power to the home, they perform a series of tests. This includes checking the voltage, confirming the charger powers on, and testing its communication features to complete the installation.
التصاريح والتفتيش
A professional installation includes handling all necessary paperwork. Permits and inspections are not obstacles; they are safeguards that protect the homeowner.
When an Electrical Permit is Required
تتطلب معظم السلطات القضائية تصريحًا كهربائيًا لتركيب أجهزة شحن المركبات الكهربائية. عادةً ما يتولى الكهربائي عملية تقديم طلب التصريح. يكون التصريح ضروريًا في الغالبية العظمى من الحالات لأن المشروع يتضمن إضافة دائرة كهربائية جديدة عالية الطاقة إلى المنزل. تشمل المواقف المحددة التي تستلزم تصاريح أو موافقات خاصة:
- التثبيتات في مساحة مشتركة، مثل مرآب وقوف السيارات في مجمع سكني.
- الأعمال التي تتطلب ترقية لوحة الخدمة أو تركيب لوحة فرعية جديدة.
- العقارات التي لديها “خدمة كهربائية مشتركة,”، والتي قد تتطلب موافقة من شركة المرافق.
- التثبيتات التي لا تستوفي معايير ‘لوائح البناء القياسية‘، مثل وضع شاحن على معلم تاريخي.
دور التفتيش الكهربائي النهائي
بعد اكتمال العمل، قد يحتاج مفتش البناء المحلي إلى إجراء مراجعة نهائية. هذا التحقق من طرف ثالث هو الختم النهائي للموافقة على المشروع. مهمة المفتش هي التأكد من امتثال العمل لجميع الرموز الكهربائية الوطنية والمحلية. أثناء التفتيش، سيتحقق من عدة جوانب رئيسية في التثبيت:
- أن جميع المعدات، بما في ذلك الشاحن والقاطع والأسلاك، ذات تصنيف وحجم صحيحين لتيار الدائرة الكهربائية.
- أن الدائرة مزودة بحماية مناسبة ضد الأعطال الأرضية والدوائر القصيرة.
- أن وحدة الشحن مثبتة بشكل آمن على الارتفاع الصحيح.
- وجود تهوية مناسبة للتركيبات الداخلية.
- أن قاطع التيار في متناول اليد لجميع المكونات ذات الصلة.
اجتياز هذا التفتيش النهائي يمنح صاحب المنزل راحة البال، مع العلم أن تركيب شاحن المركبة الكهربائية الجديد تم بشكل احترافي، والأهم من ذلك، أنه آمن.
تكلفة تركيب شاحن مركبة كهربائية
الفهم تعد تكلفة تركيب شاحن مركبة كهربائية جزءًا حاسمًا من عملية التخطيط لأي مالك جديد لمركبة كهربائية. إجمالي النفقات هو مزيج من مكونين رئيسيين: سعر الجهاز نفسه وتكلفة العمالة المهنية للـ التركيب. يمكن أن تختلف هذه الأرقام بشكل كبير بناءً على المعدات المختارة وتعقيد الإعداد الكهربائي للمنزل.
تفصيل تكاليف الأجهزة
النفقة الكبرى الأولى هي شراء محطة الشحن من المستوى 2. يقدم السوق مجموعة واسعة من المنتجات ذات الميزات والقدرات المختلفة، مما يؤثر مباشرة على السعر.
نطاق أسعار شواحن المستوى 2
يمكن لصاحب المنزل أن يتوقع أن يتراوح سعر شاحن سكني جيد من المستوى 2 تقريبًا من 400 دولار إلى أكثر من 1200 دولار. عادةً ما تقع الشواحن الأساسية غير الذكية في الطرف الأدنى من هذا النطاق. بينما تبلغ النماذج الأكثر تقدمًا والغنية بالميزات من العلامات التجارية الفاخرة سعرًا أعلى.
العوامل المؤثرة على سعر الشاحن
هناك عدة عوامل رئيسية تحدد السعر النهائي التكلفة لوحدة الشحن. يجب على المشتري مراعاة هذه العناصر لاختيار شاحن يلبي احتياجاته دون إنفاق مفرط.
- خرج الطاقة (الأمبيرية): الشواحن ذات التيار الأعلى (مثل 48 أمبير) التي توفر سرعات شحن أسرع عادةً ما تكلف أكثر من الموديلات ذات التيار المنخفض (مثل 16 أمبير أو 32 أمبير).
- ميزات ذكية: الشواحن المزودة باتصال Wi-Fi وضوابط تطبيق الهاتف الذكي وقدرات مراقبة الطاقة تكون أكثر تكلفة من الشواحن الأساسية “غير الذكية”.
- العلامة التجارية وجودة التصنيع: غالبًا ما يكون للعلامات التجارية الراسخة المعروفة بالموثوقية وتصميمها القوي المقاوم للعوامل الجوية نقطة سعر أعلى.
- طول الكابل: عادةً ما تحمل الوحدات ذات كابلات الشحن الأطول (25 قدمًا مقابل 18 قدمًا) تكلفة أعلى قليلاً.
توزيع تكاليف التركيب
تعد العمالة المهنية للـ التركيب التركيب جزءًا كبيرًا من إجمالي تكلفة المشروع. يعتمد السعر النهائي بشكل كبير على تفاصيل العقار والبنية التحتية الكهربائية الحالية.
ما تتضمنه “التركيبة القياسية”
تفترض “التركيبة” “القياسية” أو "الأساسية" التركيب إعدادًا مباشرًا. يتراوح سعر هذه الخدمة عمومًا من 600 دولار إلى 1500 دولار. بينما كل مشروع فريد، فإن الباقة القياسية تغطي عادةً ما يلي:
- تركيب دائرة مخصصة جديدة 240 فولت وقاطع مناسب في اللوحة الكهربائية.
- تثبيت وحدة الشحن شحن على الحائط في مرآب أو على جدار خارجي.
- مد كابل كهربائي بطول محدود (أقل من 40 قدمًا على سبيل المثال) من اللوحة إلى الشاحن.
- التوصيل النهائي، وتشغيل، واختبار الشاحن لضمان عمله بشكل صحيح.
العوامل الشائعة التي تزيد من تكاليف العمالة
تتطلب العديد من المنازل أكثر من مجرد تركيب قياسي، مما يزيد من تكلفة العمالة التكلفة. سيقوم الكهربائي بتحديد هذه العوامل أثناء التقييم المبدئي للموقع. يجب أن يدرك أصحاب المنازل العوامل التي ترفع السعر عند تقييم تكلفة تركيب شاحن مركبة كهربائية.
التكاليف الإضافية المحتملة:
- المسافة من اللوحة الكهربائية: كلما زادت مسافة الشاحن عن اللوحة الكهربائية، زادت الحاجة إلى الكابل والعمالة. تشغيل الكابلات لمسافات طويلة يزيد بشكل كبير من تكلفة المشروع.
- حفر الخنادق: للتركيبات الخارجية البعيدة عن المنزل، قد يحتاج الكهربائي إلى حفر خندق لدفن قناة الكهرباء. هذه المهمة وحدها يمكنها إضافة 300 دولار إلى 500 دولار أو أكثر إلى الفاتورة.
- ترقيات اللوحة الكهربائية: إذا كانت اللوحة ممتلئة أو تفتقر إلى السعة، فإن الترقية أو إضافة لوحة فرعية تصبح ضرورية. يمكن أن يضيف هذا عدة مئات إلى أكثر من ألفي دولار إلى التكلفة الإجمالية.
- التصاريح: غالبًا ما تكون تصاريح الكهرباء البلدية مطلوبة ويمكن أن تكلف بين 50 دولارًا و 200 دولار.
العثور على الخصومات والإعفاءات الضريبية
للمساعدة في تعويض النفقة، يمكن لأصحاب المنازل الاستفادة من حوافز متنوعة من الحكومة وشركات المرافق. يمكن لهذه البرامج أن تقلل صافي التكلفة بشكل كبير. التكلفة لشراء وتركيب معدات الشحن المنزلية. شحن .
الإعفاءات الضريبية الفيدرالية لمعدات شحن السيارات الكهربائية
في الولايات المتحدة، قد يكون أصحاب المنازل مؤهلين للحصول على الائتمان الضريبي للبنية التحتية للوقود البديل. الحوافز الفيدرالية. يمكن أن تغطي هذه الحوافز نسبة من إجمالي تكلفة المشروع التكلفة, ، بما في ذلك كل من الأجهزة و التركيب رسوم التركيب. يجب على صاحب المنزل استشارة أخصائي ضرائب لتأكيد أهليته وفهم المزايا المحددة المتاحة للسنة الضريبية الحالية.
خصومات شركات المرافق المحلية والولائية
بالإضافة إلى الحوافز الفيدرالية، تقدم العديد من الولايات والحكومات المحلية وشركات المرافق خصومات خاصة بها. تم تصميم هذه البرامج لتشجيع اعتماد المركبات الكهربائية من خلال جعل الشحن المنزلي أكثر بأسعار معقولة. يجب على صاحب المنزل البحث عن الحوافز المتاحة في منطقته المحددة. يمكن أن تكون هذه الخصومات في بعض الأحيان عرض استرداد نقدي مباشر عند شراء شاحن مؤهل أو رصيد على فاتورة الكهرباء لصاحب المنزل.
يعد تركيب شاحن مركبة كهربائية منزلي خطوة أساسية لتعظيم الراحة والفعالية من حيث التكلفة لامتلاك مركبة كهربائية. تتطلب عملية تركيب شاحن المركبة الكهربائية بأكملها تخطيطًا دقيقًا، بدءًا من تقييم النظام الكهربائي إلى واختيار الأجهزة المناسبة. يجب على صاحب المنزل دائمًا الاعتماد على كهربائي مؤهل ومرخص لتركيب أجهزة شاحن المركبة الكهربائية بأمان.
يضمن هذا التركيب الاحترافي أن يكون شاحن المركبة الكهربائية المنزلي موثوقًا به و متوافقًا مع اللوائح. يحمي التركيب السليم الاستثمار في شاحن مركبة كهربائية منزلي ويوفر راحة البال القصوى. 🛡️
الأسئلة الشائعة
هل يمكن لصاحب المنزل تركيب شاحن كهربائي بنفسه؟
لا يجب على صاحب المنزل محاولة التركيب الذاتي مطلقًا. هذا مشروع عالي الجهد يتطلب كهربائيًا مرخصًا. يضمن التركيب الاحترافي السلامة والامتثال للوائح وحماية ضمانات المنزل والمركبة. يخلق التوصيل غير السليم مخاطر كبيرة للحريق والصدمات الكهربائية.
كم من الوقت يستغرق تركيب شاحن السيارة الكهربائية القياسي؟
عادةً ما يتم إكمال التركيب القياسي في غضون بضع ساعات. سيقوم الكهربائي بتركيب الدائرة الجديدة، وتثبيت الوحدة، واختبار النظام. ستستغرق الوظائف الأكثر تعقيدًا، مثل تلك التي تتطلب ترقية اللوحة الكهربائية أو تشغيل كابلات طويلة، وقتًا أطول.
هل تتطلب جميع عمليات تركيب شاحنات المركبات الكهربائية تصريحًا؟
تتطلب معظم الولايات القضائية تصريحًا كهربائيًا لإضافة دائرة 240 فولت جديدة. يتولى الكهربائي المرخص هذه العملية. يضمن التصريح أن يقوم مفتش طرف ثالث بالتحقق من أن العمل آمن ويتوافق مع جميع اللوائح الكهربائية المحلية والوطنية.
هل يمكن توصيل شاحن مركبة كهربائية بكابل تمديد؟
لا. لا يجب على صاحب المنزل استخدام كابل تمديد مع شاحن مركبة كهربائية من المستوى 2 مطلقًا. تسحب هذه الأجهزة طاقة كبيرة بشكل مستمر. يمكن أن يسخن كابل التمديد ويخلق خطر حريق خطير. يتطلب الشاحن دائرة مخصصة ومنفصلة ومركبة بشكل دائم.
ماذا يحدث إذا كانت اللوحة الكهربائية ممتلئة؟
لدى الكهربائي عدة حلول إذا لم تكن هناك فتحات فارغة في اللوحة. يمكنهم في بعض الأحيان دمج الدوائر باستخدام قواطع كهربائية مزدوجة. إذا لم يكن ذلك خيارًا، فسيقومون بتركيب لوحة فرعية صغيرة لإنشاء المساحة اللازمة لدائرة الشاحن الجديدة.
هل يعمل أي شاحن من المستوى 2 مع أي سيارة كهربائية؟
تستخدم جميع المركبات الكهربائية الحديثة تقريبًا وشواحن المستوى 2 في أمريكا الشمالية نفس الموصل J1772. يضمن هذا التوحيد القياسي إمكانية التشغيل البيني. تتطلب مركبات تسلا محولًا صغيرًا، والذي يتم تضمينه عادةً مع شراء المركبة، لاستخدام شاحن غير تابع لتسلا.
كم ستزيد فاتورة الكهرباء بسبب شاحن منزلي؟
تعتمد التكلفة على أسعار الكهرباء المحلية وعادات القيادة. يقلل الشحن خلال ساعات الليل خارج أوقات الذروة النفقات بشكل كبير. يساعد الشاحن الذكي المزود بميزات الجدولة صاحب المنزل على الشحن تلقائيًا عندما تكون الكهرباء أرخص، مما يحسن تكلفة كل ميل. ⚡