
You may wonder how easy it is to install an electric vehicle charger at home. Over 80% of electric vehicle owners choose to charge at home, while 51% use public networks at least once a month.
| Méthode de chargement | Percentage of EV Owners |
|---|---|
| Charge at Home | 80% |
| Use Public Network | 51% (at least once/month) |
Installation d'un Chargeur EV involves several steps. You must select a safe location, confirm your electrical system supports the charger, and choose among Fabricants de chargeurs de VE. Some tasks require professional expertise, especially when upgrades or permits are necessary.
Assessing Your Home for Electric Vehicle Charging

Evaluating Your Electrical System
Panel Capacity and Upgrades
You need to start by checking your electrical panel. Most Level 2 chargers require a dedicated 240-volt circuit and draw between 30 and 50 amps. Your panel must have enough capacity to handle this extra load. If your panel is already near its limit, you may need an upgrade before installing a charger.
Conseil : A licensed electrician can help you perform a household load calculation to ensure your system can support the charger safely.
- Check if your panel can handle the additional load from an EV charger.
- Inspect the quality of your wiring to confirm it meets modern standards.
- Determine if there is space for a new dedicated breaker.
Exigences relatives aux disjoncteurs
A dedicated circuit breaker is essential for safe EV charging. You should verify that your panel has available slots for a new breaker. The breaker must match the charger’s power rating to prevent overloads and ensure efficient operation.
- Confirm the availability of dedicated breakers.
- Ensure the breaker size aligns with the maximum charging current.
- Use only high-quality breakers and wiring for safety.
Reviewing Your Parking and Charger Location
Placement à l'intérieur ou à l'extérieur
You want to choose a location that offers both convenience and protection. Many homeowners install chargers inside their garage for easy access and weather protection. If your garage space is limited, outdoor installation is possible, but you must select a weatherproof charger.
- Place the chargepoint near your driveway or inside your garage.
- Consider weather protection to enhance durability.
- Choose a location that avoids tripping hazards and allows easy access.
Distance to Electrical Panel
The distance between your charger and the electrical panel affects installation complexity and cost. Shorter distances reduce wiring needs and potential voltage drop.
Remarque : The charging cable should be at least 20 feet long to reach your vehicle comfortably.
- Position the charger to align with your typical parking habits.
- Test the space for adequate side clearance and door functionality.
- Ensure the cable can reach your EV’s charging port without obstruction.
Determining Power Needs for Electric Car Charging
Charging Speed Preferences
Your charging speed depends on the power rating of your charger and your vehicle’s compatibility. Higher power chargers deliver faster charging but require more robust electrical infrastructure.
| Aspect | Description |
|---|---|
| Maximum Power Demand | Each charger operates at its rated or maximum current, requiring careful planning. |
| Equipment Sizing | Circuits must match the maximum charging current for safety and efficiency. |
| Load Management Systems | These systems help prevent oversizing and optimize costs, especially with multiple chargers. |
Compatibilité des véhicules
You should always check your vehicle’s charging requirements before selecting a charger. Some vehicles support higher charging rates, while others do not.
- Confirm your vehicle’s maximum charging rate.
- Ensure the charger and cable are compatible with your EV’s port.
- Consult your vehicle manual for specific charging recommendations.
⚡ Proper assessment ensures a safe, efficient, and future-ready home charging setup.
Choosing the Right Electric Car Charger
Chargeurs de niveau 1 et chargeurs de niveau 2
Charging Times and Efficiency
You face a key decision between Level 1 and Level 2 chargers. Level 1 chargers plug into a standard household outlet and work well for low-mileage drivers. Level 2 chargers require a dedicated 240-volt circuit and deliver much faster charging speeds. Le tableau ci-dessous met en évidence les principales différences:
| Fonctionnalité | Chargeur de niveau 1 | Chargeur de niveau 2 |
|---|---|---|
| Vitesse de chargement | Slow, ideal for overnight use | Adds 10-30 miles of range per hour |
| Temps de charge | Jusqu'à 40 heures pour une charge complète | 4-8 heures pour une charge complète |
| Cost of Equipment | Included with most EVs | $1,300-$2,000 |
| Coûts d'installation | No installation needed | $1,500-$3,500 |
| Electrical Demand | Minimal, works in nearly any home | May require electrical panel upgrades |
| Monthly Electrical Costs | $15-$30 added to bill | $20-$50 added to bill |
| Best Use | Conducteurs à faible kilométrage | Daily drivers with higher mileage |
| Home Practicality | Practical for low usage | More flexible for multiple EVs |
| Efficacité énergétique | Moins efficace en raison des délais plus longs | More energy-efficient |
| Maintenance Needs | Low maintenance | Low maintenance |
Conseil : If you drive daily or own multiple EVs, a Level 2 charger offers greater flexibility and efficiency.
Exigences en matière d'alimentation
Level 1 chargers draw minimal power and suit most homes without upgrades. Level 2 chargers demand more electricity and may require you to upgrade your electrical panel. You should always check your panel’s capacity before installation. A licensed electrician can help you determine if your system supports a Level 2 charger.
Smart Features for Electric Vehicle Charging
Wi-Fi et intégration d'applications
Modern chargers often include Wi-Fi connectivity and app integration. These features let you monitor charging status, track energy use, and receive notifications on your smartphone. You gain more control and convenience over your charging routine.
Planification et suivi
Smart chargers allow you to schedule charging sessions, monitor energy consumption, and optimize charging times. Many models offer advanced features such as:
- Équilibrage dynamique de la charge : Prevents circuit overloads by managing the power drawn by your home and EV.
- Vehicle-to-Home (V2H): Uses your EV battery as a backup energy source for your home.
- Over-the-Air Updates: Keeps your charger up to date with the latest features and security improvements.
- Off-Peak Charging: Lets you charge during lower-cost electricity periods, saving money.
Smart features provide ease, convenience, and longer battery life. They also help you adapt to changing needs and maintain optimal performance.
Ensuring Compatibility with Your Vehicle
Types de fiches et normes
You must ensure your charger matches your vehicle’s connector type. Most EVs in North America use the J1772 connector for Level 1 and Level 2 charging. Some models, especially for DC fast charging, use CHAdeMO or CCS connectors. Always check your vehicle’s manual for compatibility.
| Facteur | Description |
|---|---|
| Type de connecteur | Different EVs use various charging ports like CHAdeMO and CCS. |
| Exigences en matière d'installation | Safe operation requires proper installation and compliance with safety standards. |
Recommended Brands
Several reputable brands offer reliable home chargers. Look for manufacturers that provide strong warranties, responsive customer support, and regular software updates. Popular options include ChargePoint, JuiceBox, and Wallbox. Always choose a charger certified by recognized safety organizations.
Choosing the right charger ensures safe, efficient, and future-ready home charging for your electric vehicle.
Installation Requirements for Electric Vehicle Charger
Installation par un bricoleur ou par un professionnel
When DIY Is Safe and Practical
You may consider a do-it-yourself approach if you have experience with electrical systems and feel confident working with wiring and circuit breakers. DIY installation can offer several benefits:
- You gain hands-on knowledge of your home’s electrical setup.
- You save on labor costs, which can make the project more affordable.
- You control the choice of materials and the installation schedule.
However, you must recognize the risks. Electrical work involves hazards, especially when you install an electric vehicle charger. Mistakes can lead to safety issues or code violations. If you choose to install an ev charger yourself, always follow manufacturer instructions and local codes. You should only proceed if you have the right skills and tools.
Quand faire appel à un électricien agréé ?
For most homeowners, hiring a licensed electrician remains the safest and most reliable option. Professionals bring expertise and experience to the job. They ensure your installation meets all safety standards and local regulations. You also save time and avoid the stress of troubleshooting complex electrical issues.
- Professionals help you avoid costly mistakes that can arise from improper installation.
- You maintain warranty protection for both the charger and your vehicle.
- You reduce the risk of electrical hazards and ensure code compliance.
While professional installation costs more, you gain peace of mind and long-term reliability. The total cost to install an chargeur de véhicule électrique ranges from $1,200 to $2,600 with a professional, compared to $800 to $1,600 for a DIY project. However, any errors during a DIY install can quickly erase those savings.
Permits and Local Regulations for Install an EV Charger
Building Codes and Inspections
Before you install an electric vehicle charger, you must check local requirements. Most cities and counties require permits for electrical upgrades. You need to follow local electrical codes, such as the National Electrical Code (NEC), and comply with safety standards for EV charging equipment.
| Étape | Description |
|---|---|
| 1 | Check Local Requirements: Verify with local building department for specific permit needs. |
| 2 | Hire a Licensed Electrician: Some areas require professional installation. |
| 3 | Soumettre une demande : Remplir et soumettre la demande accompagnée des frais. |
| 4 | Payer les frais : Les coûts peuvent varier de $50 à $500 en fonction du lieu. |
| 5 | Schedule an Inspection: Ensure the installation meets local codes and standards. |
You must schedule an inspection after you install an ev charger. Inspectors confirm that your system meets all safety and code requirements. Skipping this step can result in fines or the need to redo the work.
HOA and Community Rules
If you live in a community with a homeowners association (HOA), you need to review their rules before you install an electric vehicle charger. Some HOAs have guidelines about exterior modifications, visible wiring, or equipment placement. You may need to submit plans or request approval before starting the project. Always communicate with your HOA early to avoid delays or conflicts.
Preparing for Install an Electric Vehicle Charger
Tools and Materials Checklist
Proper preparation ensures a smooth installation process. Gather all necessary tools and materials before you begin. Here is a checklist to help you get started:
- Compatible electric vehicle charger
- Circuit breaker (matched to charger specifications)
- Electrical conduit and wiring
- Mounting hardware (wall anchors, screws, brackets)
- Drill and basic hand tools
- Testeur de tension et multimètre
- Safety gear (gloves, safety glasses)
You may need additional materials based on your home’s layout and the charger’s requirements. Always consult the installation manual for specific recommendations.
Précautions de sécurité
Safety must remain your top priority when you install an electric vehicle charger. Follow these precautions to protect yourself and your property:
- Turn off power at the main panel before starting any electrical work.
- Use a voltage tester to confirm circuits are de-energized.
- Wear appropriate safety gear at all times.
- Avoid working in wet or damp conditions.
- Double-check all connections for tightness and proper insulation.
You should also review local regulations and obtain any required permits before you install an ev charger. If you feel unsure at any step, contact a licensed electrician for assistance.
Tip: A step-by-step approach helps you avoid mistakes and ensures your installation meets all safety and code requirements.
To prepare your home for installation, follow these steps:
- Evaluate your current electrical system to confirm it can support the additional load.
- Choose a charger that fits your vehicle and daily routine.
- Decide on a convenient location for charging.
- Check local regulations for permits and standards.
- Hire a licensed electrician to install and test the system for safety.
By following these guidelines, you set yourself up for a successful and safe experience when you install an electric vehicle charger at home.
Step-by-Step Guide to Install an Electric Vehicle Charger

Pre-Installation Checklist
Before you begin, you need to prepare your workspace and confirm your home’s readiness for installation. Careful planning helps you avoid mistakes and ensures a safe process.
Power Off and Safety Checks
You must always turn off the main power before working with electrical systems. Safety checks protect you and your property from electrical hazards.
- Use a voltage tester to confirm that circuits are de-energized.
- Wear safety gear, including gloves and safety glasses.
- Inspect the installation area for water leaks or dampness.
- Keep a fire extinguisher nearby in case of emergencies.
⚠️ Safety first: Never skip these steps when you install an electric car charger.
Gathering Equipment
You need the right tools and materials for a smooth installation. Gather everything before you start to avoid delays.
- Electric vehicle charger (compatible with your car)
- Circuit breaker matched to the charger’s specifications
- Electrical conduit and wiring
- Mounting hardware (anchors, screws, brackets)
- Drill, screwdriver, and basic hand tools
- Testeur de tension et multimètre
- Safety gear
You should also review the charger’s installation manual for any special requirements.
Mounting the Electric Car Charger
Proper mounting ensures stability and longevity. You must choose the best location and method for your setup.
Wall Mounting Options
Most homeowners prefer wall mounting for convenience and protection. You should plan your installation ahead of time and map out the area.
- Select a spot close to your parking space and electric panel.
- Use mounting brackets and anchors suitable for your wall type (drywall, concrete, or brick).
- Decide between hardwire or plug-in configuration. Hardwiring offers more security and durability, reducing risks from faulty connections.
- Leave enough clearance around the charger for ventilation and easy cable access.
Note: Hardwired chargers provide a permanent solution, while plug-in models offer flexibility if you need to move the charger later.
Pedestal Installation
If wall mounting is not possible, pedestal installation offers an alternative. You can place the charger on a sturdy stand near your parking area.
- Choose a weatherproof pedestal designed for outdoor use.
- Secure the pedestal to a solid base, such as concrete.
- Route wiring through the pedestal for a clean look and added protection.
- Ensure the charger remains accessible and free from obstructions.
Plan your installation area and determine the best location for the charger. This step helps you avoid future issues and makes charging an electric car easier.
Making Electrical Connections for Electric Vehicle Charging
You must connect the charger to your home’s electrical system. This step requires precision and attention to detail.
Running the Wiring
You need to run electrical wiring from your panel to the charger location. Use conduit to protect the wires and follow local codes for installation.
- Measure the distance from the panel to the charger.
- Cut and route conduit along walls or underground if needed.
- Pull the correct gauge wire through the conduit.
- Secure all connections and check for tightness.
Choosing the right type of charger (Level 1, Level 2, or Level 3) depends on your needs and existing electrical infrastructure.
Connecting to the Panel
You must connect the wiring to a dedicated circuit breaker in your electrical panel. This step ensures safe operation and compliance with regulations.
- Turn off the main power at the panel.
- Install the new circuit breaker matched to your charger’s rating.
- Connect the wiring to the breaker and ground as specified.
- Double-check all connections for security and proper insulation.
- Restore power and test the circuit for voltage.
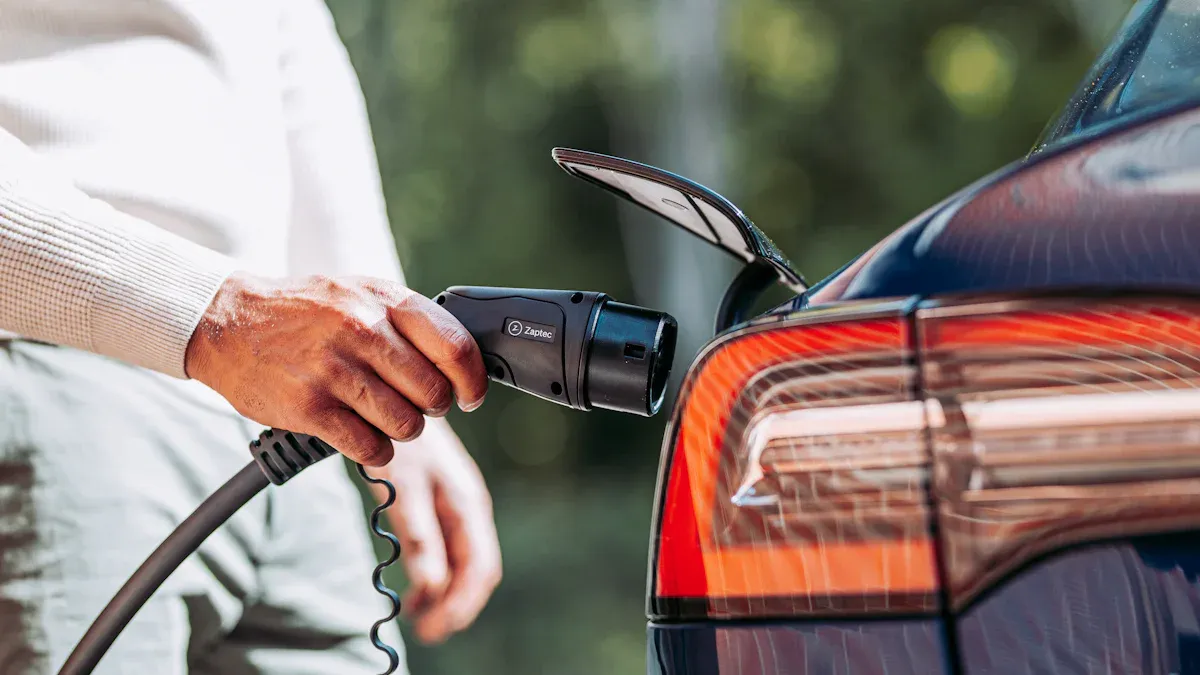
Once you complete these steps, you can begin charging an electric car at home. The process starts when you plug the cable into your vehicle. You may use an app to initiate charging, and the system will verify your authorization before starting the session.
Hire a certified electrician to ensure the installation meets National Electric Code requirements and local regulations. Professional installation guarantees safety and reliability when you install an electric car charger.
Final Setup and Testing for Install an EV Charger
Powering On
You have completed the physical installation of your electric vehicle charger. Now, you need to ensure that the system powers on safely and operates as intended. Begin by performing a thorough inspection of all electrical connections. Check that every wire is secure and that all terminals are tight. Look for any exposed wiring or loose fittings. These checks help you prevent electrical hazards and ensure compliance with safety standards.
Before you restore power, confirm that the area around the charger is dry and free from debris. Use a voltage tester to verify that the circuit is still de-energized. When you are ready, restore power at the main panel. Power up the system incrementally. This approach allows you to monitor for any unusual sounds, smells, or warning lights. If you notice anything abnormal, shut off the power immediately and re-inspect your work.
⚡ Conseil : Always keep a fire extinguisher nearby and never work alone when handling high-voltage equipment.
After you restore power, observe the charger’s indicator lights. Most modern chargers display a sequence of lights or messages to confirm successful startup. Refer to the manufacturer’s manual for specific startup signals. If the charger does not power on, double-check the breaker, wiring, and connections.
Testing the Charger
Once the charger powers on, you need to perform comprehensive testing to ensure safe and reliable operation. Start by checking the voltage at the charger terminals using a multimeter. Confirm that the voltage matches the charger’s specifications. Next, test the current draw during a charging session. Plug your electric vehicle into the charger and monitor the current flow. The reading should align with the charger’s rated output.
You should also verify network connectivity if your charger includes smart features. Connect the charger to your home Wi-Fi and use the companion app to check status, schedule charging, and monitor energy usage. This step ensures that you can take full advantage of remote monitoring and control.
A successful installation requires more than just technical checks. You need to familiarize yourself with the charger’s operation and safety protocols. Review the user manual and practice starting and stopping a charging session. Learn how to use any emergency shutoff features. If others in your household will use the charger, provide them with basic training on safe operation and maintenance.
Here is a checklist to guide you through the final setup and testing process:
- Inspect all electrical connections for tightness and proper insulation.
- Confirm that conduit or cable protection systems are in place.
- Test voltage and current at the charger terminals.
- Verify network connectivity and app integration.
- Observe the charger’s startup sequence and indicator lights.
- Plug in your vehicle and confirm charging begins as expected.
- Review safety features and emergency procedures.
- Notify your local Distribution Network Operator (DNO) about the installation to support grid stability.
- Establish a maintenance plan for regular inspections and troubleshooting.
🛠️ Remarque : Comprehensive testing and user training help you avoid future issues and maximize the lifespan of your electric vehicle charger.
By following these steps, you ensure that your home charging station operates safely, efficiently, and reliably from day one.
Costs, Incentives, and Savings for Install an Electric Car Charger
Ventilation des coûts d'installation
Coûts de l'équipement et des chargeurs
You face several options when selecting a home electric vehicle charger. The type of charger you choose will impact your upfront investment. Level 1 chargers use a standard 120V outlet and usually come with your vehicle, so you pay little or nothing for equipment. Level 2 chargers require a 240V outlet and specialized hardware, which increases the price. Level 3 chargers, designed for commercial use, demand extensive upgrades and cost the most.
| Type de chargeur | Description | Cost Implications |
|---|---|---|
| Niveau 1 | Prise standard de 120V | Lower installation cost |
| Niveau 2 | Requires 240V outlet | Higher labor costs due to electrical work |
| Niveau 3 | Extensive electrical work | Most expensive due to significant upgrades |
You should expect to pay between $300 and $800 for a Level 2 charger. Level 3 chargers often exceed several thousand dollars and are rarely installed in homes.
Labor and Permit Fees
The cost to install an electric car charger includes more than just equipment. Labor charges depend on the complexity of your electrical system and the distance from your panel to the charger location. Electricians may charge $500 to $1,500 for a standard Level 2 installation. Permit fees vary by city but usually range from $50 to $500. You may also need to pay for an inspection to ensure code compliance.
Tip: Always request a detailed quote from your electrician before starting the project. This step helps you avoid unexpected expenses.
Incentives and Grants for Electric Vehicle Charging
Federal Programs and Tax Credits
You can reduce your out-of-pocket costs by taking advantage of federal incentives. The federal government offers a tax credit for installing qualified charging equipment. This credit covers up to 30% of the total project cost, with a maximum benefit of $1,000 for residential installations. You must claim this credit when you file your annual tax return.
State and Local Rebates
Many states and utilities offer additional rebates to encourage electric vehicle adoption. These programs can further lower your installation expenses. Here are some examples:
| État | Description de l'incitation |
|---|---|
| Arkansas | $250 rebate for ENERGY STAR-certified Level 2 charger from Southwestern Electric Power Company. |
| Californie | Up to $7,500 for electric vehicles and $2,000 for charging installations from California Air Resources Board. |
| Colorado | $500 rebate for purchasing and installing a new Level 2 EV charging station from Black Hills Energy. |
| Connecticut | $500 rebate for purchasing and installing a qualifying Level 2 EV charging station from Eversource. |
You should check with your local utility or state energy office for the latest programs. Some rebates require pre-approval or proof of purchase.
Long-Term Savings from Home Electric Car Charging
Recharge à domicile ou dans une station publique
Charging your electric vehicle at home offers significant savings over public charging stations. Home charging rates typically range from $0.10 to $0.15 per kilowatt-hour (kWh). If you charge during off-peak hours, you may pay as little as $0.06 to $0.10 per kWh. Public charging stations often charge $0.30 to $0.60 per kWh, especially during peak times.
- Charging 250 miles per week at home costs about $520 per year.
- Using public stations for the same distance can cost around $1,935 annually.
- You could save nearly $1,415 each year by charging at home.
- Many homeowners report annual savings of over $1,300 compared to exclusive public charging.
Impact on Electricity Bills
You will notice an increase in your monthly electricity bill after installing a home charger. Most EV owners see an average rise of $45 per month. For example, fully charging a 24 kWh battery at $0.12 per kWh costs about $2.88. Some utilities offer special rates or discounts for EV charging, which can help you manage your expenses.
Note: Charging at home gives you control over your costs and allows you to take advantage of lower electricity rates.
Safety Tips and Maintenance for Electric Vehicle Charging
Safe Charging Practices
Avoiding Overloads
You must prioritize electrical safety when charging your electric vehicle at home. Always use a dedicated circuit for your charger. This step prevents circuit overloads and reduces the risk of fire hazards. Keep the charging area clear of flammable materials and clutter. Unplug the charger once your vehicle reaches full charge or use a smart charging system to avoid overcharging. Surge protectors add another layer of safety by guarding against power surges in your home’s electrical system.
Conseil : Never use unsuitable extension cords for EV charging. These cords can overheat and create fire risks.
Weatherproofing Outdoor Installations
If you install your charger outdoors, select a model with a waterproof rating. Make sure the charger and all connections remain protected from rain and moisture. Avoid touching the charger with wet hands to prevent electric shocks. Manage charging cables carefully to reduce tripping hazards, especially in driveways or walkways.
Routine Maintenance for Install an EV Charger
Nettoyage et inspection
Regular maintenance keeps your charging equipment safe and efficient. Clean the charger, cord, and connectors to remove dirt and oil residue. Inspect wiring and connections for wear, especially after harsh weather. During summer, check for overheating or exposed wiring. In winter, test the ground fault interrupter (GFI) to ensure it works properly. Replace worn charging cables to maintain safety and performance.
Dépannage des problèmes courants
You may encounter occasional problems with your home charger. The table below outlines frequent issues and solutions:
| Common Issue | Description | Resolution |
|---|---|---|
| Câble de chargement endommagé | Slower charging, safety risks | Inspect and replace if necessary |
| Connectivité insuffisante | Intermittent or failed charging | Check connections and ensure a secure fit |
| Domestic Extension Lead | Not suitable, risk of shock and fire | Avoid extension cords; use direct wall outlet |
| Faible connectivité à l'internet | Affects smart charger features | Verify and troubleshoot your network |
| Mises à jour du logiciel | Missed updates cause operational issues | Regularly check for firmware updates |
| Chargeur mural défectueux | No power or inconsistent charging | Inspect for damage; consult a professional if issues persist |
Remarque : Addressing small issues early prevents larger problems and extends the life of your charger.
Quand faire appel au service
Warning Signs
You should contact a professional if you notice any of the following:
- Unusual noises from the charger
- A burning smell during operation
- Frequent error codes on the display
- Circuit breaker trips repeatedly
- Persistent electrical issues, such as flickering lights
Handling electrical components without proper training can be dangerous. If you feel uncertain about diagnosing or fixing a problem, seek expert help to avoid risks like electric shock or fire.
Finding Qualified Technicians
Certified technicians possess the skills and tools needed for safe repairs. They follow strict safety protocols and ensure your charger remains properly grounded and fully functional. Always choose a licensed electrician or an authorized service provider for any repairs or inspections.
Regular maintenance and prompt attention to warning signs keep your home charging station safe and reliable for years to come.
Getting the Most from Your Home Electric Car Charger
Optimisation des horaires de chargement
Chargement hors pointe
You can maximize savings and efficiency by charging your electric vehicle during off-peak hours. Many utility companies offer time-of-use pricing, which means electricity costs less at night or during periods of low demand. Charging at home during these times reduces your energy bill and helps balance the grid. You should check your local utility’s rate schedule to identify the best hours for electric vehicle charging. Planning ahead ensures you avoid higher daytime rates and supports a more stable energy system.
💡 Conseil : Some utilities provide real-time pricing updates. Use these to schedule charging sessions when rates drop.
Utilisation des fonctions intelligentes
Modern home chargers come equipped with smart features that make optimizing your charging schedule simple. You can use mobile apps to set timers, monitor charging progress, and receive notifications. These tools allow you to automate charging sessions based on your preferences or utility pricing. Timed charging strategies help you take advantage of lower rates and reduce grid strain. Smart controls also let you pause or delay charging if demand spikes or if you want to use renewable energy from your home system.
- Plan ahead by checking the availability of charging stations and any fees.
- Schedule charging during off-peak hours to minimize grid strain and benefit from lower rates.
- Use real-time pricing and timed charging strategies for the most effective results.
📱 Smart features give you control and flexibility, making installing electric car charging stations at home more convenient and cost-effective.
Integrating with Home Energy Systems for Electric Vehicle Charging
Solar Panel Compatibility
You can further enhance your electric vehicle charging setup by integrating solar panels. Solar photovoltaic (PV) panels capture sunlight and convert it into electricity during the day. This clean energy can power your home and charge your vehicle, reducing reliance on the grid. When you install solar panels, you create a sustainable loop that supports both your household and your transportation needs. Many homeowners find that installing electric car charging stations alongside solar panels maximizes their investment in renewable energy.
Battery Storage Options
Battery storage systems, such as lithium-ion units, store excess solar energy for use at night or on cloudy days. You can use stored electricity to charge your vehicle when solar production is low or when grid prices are high. This approach increases your energy independence and provides backup power during outages. Smart controls in your home manage when to use, store, or export energy to the grid, depending on demand and price. By combining battery storage with installing electric car charging stations, you create a flexible and resilient energy system.
- Solar PV panels generate electricity from sunlight.
- Battery storage units keep unused electricity for later use.
- EV chargers use stored or real-time energy to charge your vehicle.
- Smart controls balance energy use, storage, and export based on demand and pricing.
⚡ Integrating solar and battery storage with your home charger supports sustainability and long-term savings.
You gain convenience, cost savings, and environmental benefits when you install a home ev charger.
- Charge overnight for stress-free mornings
- Enjoy lower costs compared to public charging
- Support cleaner air and sustainability
Homeowners with older properties should check for electrical upgrades and local regulations before starting.
| Bénéfice | Description |
|---|---|
| Financial Savings | Save on fuel and utility bills over time |
| Property Value | Increase your home’s appeal to buyers |
| Ressources de soutien | Licensed installers, rebates, and utility programs ease the process |
Start your home electric vehicle charger journey today and take advantage of available incentives and expert support.
FAQ
How long does it take to install a home electric vehicle charger?
Most installations take between two and four hours. The exact time depends on your home’s electrical system and the charger’s location. A professional electrician can complete the process efficiently and ensure all safety standards are met.
Can you use your home charger for any electric vehicle?
You can use most home chargers with any electric vehicle that supports the J1772 connector. Always check your vehicle’s manual for compatibility. Some models may require an adapter for certain plug types.
Do you need a permit to install an electric vehicle charger?
You usually need a permit for electrical upgrades, including charger installations. Local building departments set specific requirements. Always check with your city or county before starting the project to avoid fines or delays.
What should you do if your charger stops working?
First, check the circuit breaker and power supply. Inspect the charger for visible damage. If the problem persists, contact a licensed electrician or the manufacturer’s support team. Never attempt repairs if you feel unsure about electrical systems.
Is charging at home cheaper than using a public charging point?
Charging at home usually costs less per kilowatt-hour than using a public charging point. Home charging also offers more convenience and control over your schedule. You can further reduce costs by charging during off-peak hours.
Can you install a charger outdoors?
You can install a charger outdoors if you choose a weatherproof model. Ensure all wiring and connections have proper protection from rain and moisture. Outdoor installations must meet local codes for safety.
How often should you maintain your home charger?
You should inspect and clean your charger every few months. Check cables and connectors for wear. Test safety features like ground fault protection regularly. Schedule professional inspections if you notice any issues or after severe weather.